How to Implement SSR in Next.js: Complete Guide
Learn how to implement SSR in Next.js with this 2025 guide. Boost SEO, speed, and Google rankings with our step-by-step Next.js SSR tutorial.
Creating desktop applications no longer requires starting from scratch with entirely new technologies. Thanks to Electron and Next.js, developers can build powerful, cross-platform desktop apps using the same skills they already use for web development. While tools like Nextron exist to simplify the process, setting up Electron with Next.js manually gives you more control, flexibility, and a leaner build.
In this tutorial, we will walk through building a simple Counter desktop app using Electron for the desktop shell and Next.js for the UI, without Nextron. This step-by-step guide will help you understand how Electron integrates with a Next.js project, how to set up the main process and preload scripts, and how to run everything smoothly in development and production.
In terminal run below command,
npx create-next-app electron-app
cd electron-app
npm install --save-dev electron electron-builder
npm install --save-dev concurrently wait-on cross-env
electron, runtime that runs your app on the desktop.
electron-builder, creates installers (exe, dmg, AppImage).
concurrently, wait-on, cross-env, let us run Next dev + Electron together and pass env vars cross-platform.
Create an electron/ folder with two files(main and preload) :
electron-app/
├── electron/
│ ├── main.js
│ └── preload.js
├── pages/
│ └── index.js
├── public/
├── package.json
└── …
Create electron/main.js (main process + IPC handlers):
const { app, BrowserWindow, ipcMain } = require('electron');
const path = require('path');
let mainWindow;
let count = 0; // stored in main process
function createWindow() {
mainWindow = new BrowserWindow({
width: 600,
height: 480,
webPreferences: {
preload: path.join(__dirname, 'preload.js'),
contextIsolation: true,
nodeIntegration: false,
},
});
const startUrl =
process.env.ELECTRON_START_URL ||
`file://${path.join(__dirname, '../out/index.html')}`;
mainWindow.loadURL(startUrl);
mainWindow.on('closed', () => {
mainWindow = null;
});
}
/* IPC handlers */
ipcMain.handle('counter:get', () => count);
ipcMain.handle('counter:increment', () => ++count);
ipcMain.handle('counter:decrement', () => --count);
ipcMain.handle('counter:reset', () => (count = 0));
app.whenReady().then(createWindow);
app.on('window-all-closed', () => {
if (process.platform !== 'darwin') app.quit();
});
app.on('activate', () => {
if (mainWindow === null) createWindow();
});
Here BrowserWindow creates the desktop window. preload.js is the safe bridge. We use ELECTRON_START_URL to point Electron to localhost in dev, and file://.../out/index.html when using the next export.
API via contextBridge:
const { contextBridge, ipcRenderer } = require('electron');
contextBridge.exposeInMainWorld('counterAPI', {
get: () => ipcRenderer.invoke('counter:get'),
increment: () => ipcRenderer.invoke('counter:increment'),
decrement: () => ipcRenderer.invoke('counter:decrement'),
reset: () => ipcRenderer.invoke('counter:reset'),
});
contextIsolation: true + nodeIntegration: false prevents renderer code from getting arbitrary Node access.
contextIsolation: true => Keeps webpage JavaScript separate from Electron’s internal code. This means the page can’t directly change or break Electron’s environment.
nodeIntegration: false => Blocks the webpage from using Node.js features like fs (file system) or child_process (run commands).
This page works both in browser and in Electron:
“use client”;
import { useEffect, useState } from 'react';
export default function Home() {
const [count, setCount] = useState(0);
useEffect(() => {
if (typeof window !== 'undefined' && window.counterAPI?.get) {
window.counterAPI.get().then(setCount).catch(() => {});
}
}, []);
const increment = async () => {
if (window.counterAPI?.increment) {
const next = await window.counterAPI.increment();
setCount(next);
} else {
setCount((c) => c + 1);
}
};
const decrement = async () => {
if (window.counterAPI?.decrement) {
const next = await window.counterAPI.decrement();
setCount(next);
} else {
setCount((c) => c - 1);
}
};
const reset = async () => {
if (window.counterAPI?.reset) {
const next = await window.counterAPI.reset();
setCount(next);
} else {
setCount(0);
}
};
return (
<div style={{ textAlign: 'center', padding: 40 }}>
<h1>Electron + Next.js Counter</h1>
<h2 style={{ fontSize: 64 }}>{count}</h2>
<div style={{ display: 'flex', gap: 12, justifyContent: 'center', marginTop: 20 }}>
<button
onClick={increment}
style={{ padding: "10px 18px", fontSize: "18px", cursor: "pointer" }}
>
<span style={{ fontSize: "28px", verticalAlign: "middle" }}>+</span>{" "}
Increment
</button>
<button
onClick={decrement}
className="cursor-pointer"
style={{ padding: "10px 18px", fontSize: "18px", cursor: "pointer" }}
>
<span style={{ fontSize: "28px", verticalAlign: "middle" }}>-</span>{" "}
Decrement
</button>
<button
onClick={reset}
style={{ padding: "10px 18px", cursor: "pointer" }}
>
Reset
</button>
</div>
</div>
);
}
The window.counterAPI guard ensures this page still works in a normal browser, useful for UI-only development or publishing a web version.
Add main, dev and build scripts:
{
"name": "electron-app",
"version": "0.1.0",
"main": "electron/main.js",
"private": true,
"scripts": {
"dev:web": "next dev",
"dev": "concurrently \"next dev\" \"wait-on http://localhost:3000 && cross-env ELECTRON_START_URL=http://localhost:3000 electron .\"",
"build:web": "next build && next export",
"build": "npm run build:web",
"start": "next start",
"electron:build": "npm run build && electron-builder"
},
"dependencies": {
"next": "15.5.3",
"react": "19.1.0",
"react-dom": "19.1.0"
},
"devDependencies": {
"@eslint/eslintrc": "^3",
"@tailwindcss/postcss": "^4",
"concurrently": "^9.2.1",
"cross-env": "^10.0.0",
"electron": "^38.1.0",
"electron-builder": "^26.0.12",
"eslint": "^9",
"eslint-config-next": "15.5.3",
"tailwindcss": "^4",
"wait-on": "^8.0.5"
},
"build": {
"appId": "com.example.myelectronapp",
"files": [
"out/**/*",
"electron/**/*",
"package.json"
]
}
}
dev: runs Next dev server and launches Electron when ready (single command)
build:web: next build && next export → static out/ folder
electron:build: builds web assets then runs electron-builder to produce installers
Start everything:
npm run dev
What happens here is,
next dev runs at http://localhost:3000
wait-on waits for that URL
electron opens the desktop app pointing to the dev server
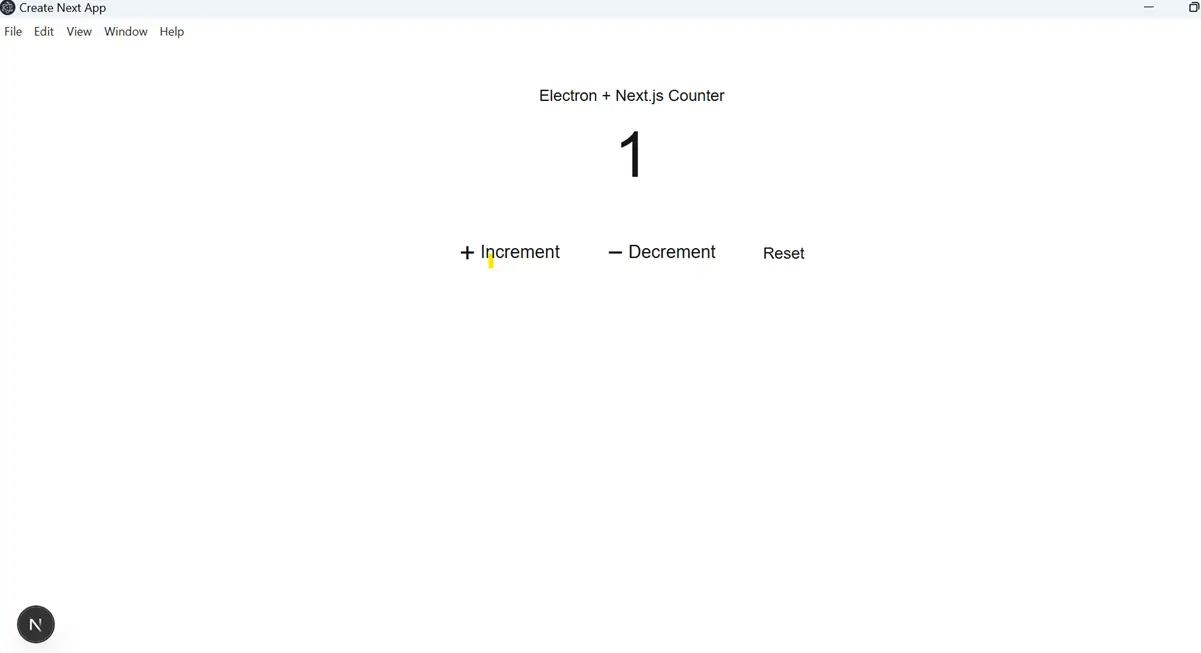
Here is electron desktop screenshot,
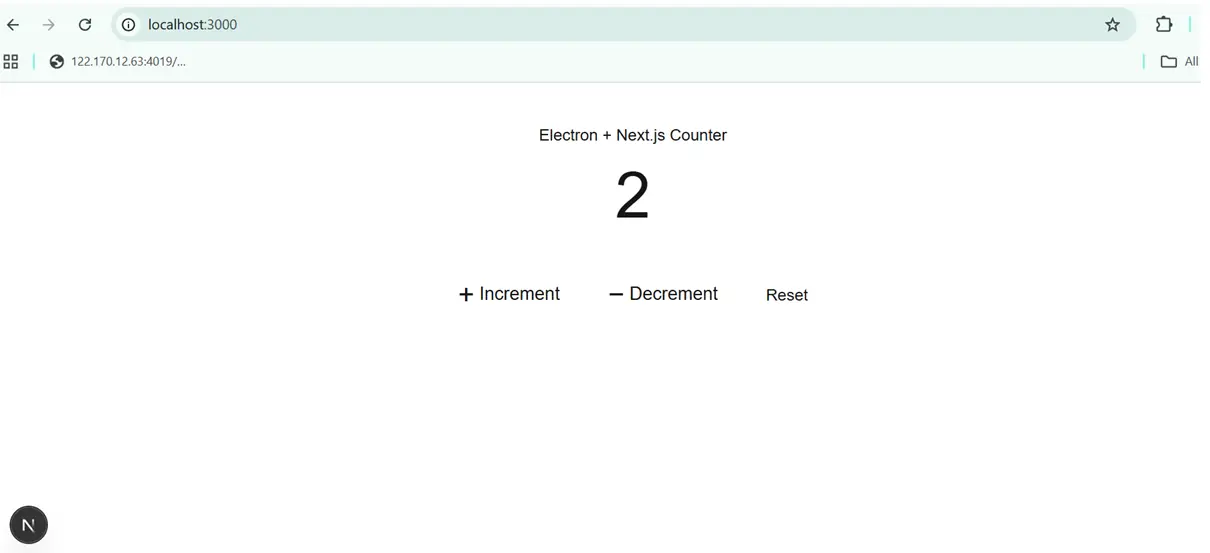
And browser UI screenshot,
By combining Next.js and Electron, you can create modern, responsive desktop applications that run across Windows, macOS, and Linux with minimal effort. This approach avoids unnecessary dependencies, keeps your project lightweight, and gives you full control over how your app is structured and deployed.
If you are looking to build custom desktop apps, web apps, or cross-platform solutions, feel free to reach out to Prishusoft. Our expert team specializes in Next.js, Electron, and modern frameworks to deliver high-quality software tailored to your business needs.
Learn how to implement SSR in Next.js with this 2025 guide. Boost SEO, speed, and Google rankings with our step-by-step Next.js SSR tutorial.
Discover how to harness the power of Supabase with Next.js to create modern, scalable web applications. Learn to set up seamless backend and frontend integration, making your next project faster and more efficient.
Explore a practical guide to integrating Angular components inside React and VueJS apps. Ideal for hybrid frontend teams seeking reusable solutions.
Learn how to build an Electron desktop app with Next.js without using Nextron. Step-by-step tutorial with setup, scripts, and code examples for creating a cross-platform desktop app.
Get in touch with Prishusoft – your trusted partner for custom software development. Whether you need a powerful web application or a sleek mobile app, our expert team is here to turn your ideas into reality.