When building applications, developers often start with a monolithic architecture, where all features are developed and deployed within a single project. While this approach is suitable for small applications, it becomes challenging to maintain, scale, and deploy as the application grows. To overcome these limitations, modern applications use microservices architecture, where the system is broken into smaller, independent services that can be developed and scaled separately. NestJS, a powerful and progressive Node.js framework built with TypeScript, offers first-class support for building microservices. It supports multiple communication transports such as TCP, Redis, MQTT, NATS, Kafka, and gRPC, making it an excellent choice for building scalable, distributed, and high-performance microservices. In this blog, we will explore what microservices are, why to use microservices, and how to implement microservices in NestJS step by step.
What is a Microservice?
A microservice is a small, independent application designed to perform one specific business function. Instead of building a single large application, the system is divided into multiple focused services, each responsible for a particular task.
Examples of Microservices
User Service
Manages user registration, authentication, and profiles
Order Service
Handles order creation and order management
Payment Service
Processes payments and transactions
Key Characteristics of Microservices
Each microservice:
Runs independently without affecting other services
Contains its own business logic and codebase
Communicates with other services using APIs or messaging protocols
This architecture improves scalability, maintainability, and fault isolation, making it ideal for modern distributed applications.
Monolith vs Microservices
Understanding the difference between Monolithic Architecture and Microservices Architecture is essential when designing scalable applications.
Monolithic Application
A monolithic application is built as a single, large project where all features are tightly coupled.
Key Characteristics:
Single large codebase
All features live in one application
If one component fails, it can impact the entire system
Difficult to scale and maintain as the application grows
Microservices Application
A microservices-based application is composed of multiple small, independent services, each handling a specific responsibility.
Key Characteristics:
Multiple small, independent services
Each service has a single responsibility
Services can be developed, deployed, and scaled independently
Easier to maintain and extend over time
Monolith vs Microservices Comparison
Monolith
One large application
Hard to scale
Tightly coupled components
Slower deployments
Microservices
Multiple small applications
Easy to scale independently
Loosely coupled services
Faster and independent deployments
Choosing microservices improves scalability, flexibility, and deployment speed, especially for large and growing applications.
Why Choose NestJS for Microservices?
NestJS is an excellent choice for microservices because:
Built-in microservices module
Supports multiple transport layers
Strong TypeScript support
Modular and scalable architecture
Clean and structured code
Easy to learn if you know basic JavaScript
Inspired by Angular (great for enterprise apps)
NestJS allows services to talk to each other using messages instead of HTTP routes.
NestJS Microservices Architecture
A typical NestJS microservices setup includes:
API Gateway (optional)
Client Service – sends messages
Microservice – listens and responds
Transport Layer – Kafka/gRPC /Redis/MQTT etc.
API Gateway → Message → Microservice → Response
NestJS uses message patterns instead of REST routes for communication.
Step-by-Step: Implementing Microservices in NestJS
What We Will Build
We will create four applications:
1. User Service (Microservice)
Manages user-related data
2. Order Service (Microservice)
Manages orders
3. Payment Service (Microservice)
Manages payments
4. API Gateway (Client)
Single entry point
Communicates with all microservices
Step 1: Install NestJS CLI
npm i -g @nestjs/cli
Choose npm or yarn and enable TypeScript.
Step 2: Create Four NestJS Applications
1. 3 Microservices
2. API Gateway – Client
#1 nest new user-service
#2 nest new order-service
#3 nest new payment-service
#4 nest new api-gateway
Now we have four separate applications.
User Service (Microservice)
Step 3: Configure User Microservice Transport
Open user-service/src/main.ts
import { NestFactory } from '@nestjs/core';
import { AppModule } from './app.module';
import { MicroserviceOptions, Transport } from '@nestjs/microservices';

async function bootstrap() {
  const app = await NestFactory.createMicroservice(
    AppModule,
    {
      transport: Transport.TCP,
      options: {
        host: '127.0.0.1',
        port: 3001,
      },
    },
  );

  await app.listen();
}
bootstrap();
Here, This sends a message instead of calling an API directly.
Step 12: Run the Applications
# terminal 1
cd user-service
npm run start
# terminal 2
cd order-service
npm run start
# terminal 3
cd payment-service
npm run start
# terminal 4
cd api-gateway
npm run start
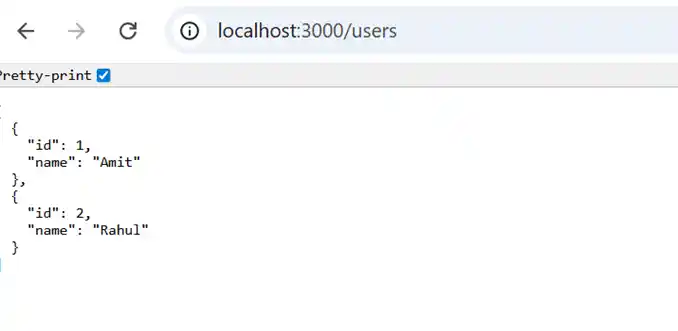
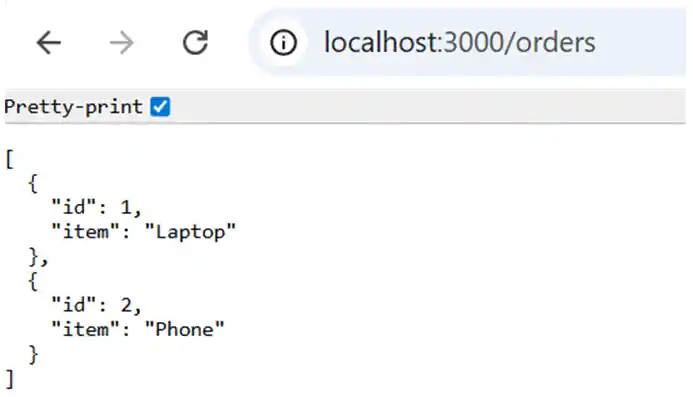
Open browser:
http://localhost:3000/users
http://localhost:3000/orders
http://localhost:3000/payments
Now you will see user data coming from the microservice, like
#1 For User
#2 For Orders
#3 For Payments
Supported Transports in NestJS
NestJS supports multiple transports:
TCP (default, simple)
Redis
MQTT
NATS
Kafka
gRPC
Choose based on scalability and reliability needs.
Best Practices
Use API Gateway pattern
Handle timeouts & retries
Implement logging & monitoring
Secure communication (JWT / mTLS)
Keep services small & focused
Use shared DTOs via libraries
When to Use Microservices?
Use microservices when:
Application is large and complex
Teams work independently
Need high scalability
Avoid microservices for small or simple applications.
Conclusion
NestJS makes implementing microservices simple and structured. With built-in support for messaging, transport layers, and dependency injection, it’s an excellent framework for building scalable distributed systems.
This example used TCP transport, but you can easily extend it to Redis, Kafka, MQTT or gRPC for production-grade systems.
Need expert help with NestJS, microservices architecture, or full-stack development? Prishusoft delivers reliable, scalable, and cost-effective software solutions. Contact us today to start building your next product with confidence.
Get in touch with Prishusoft – your trusted partner for custom software development. Whether you need a powerful web application or a sleek mobile app, our expert team is here to turn your ideas into reality.