Implementing Microservices in NestJS using MQTT
Introduction
Microservices architecture allows applications to be built as a collection of small, independent services that communicate over a network. In this guide, we demonstrate how to build NestJS microservices using MQTT as the communication protocol.
MQTT is a lightweight, publish–subscribe messaging protocol designed for real-time, event-driven systems. It is especially popular in IoT applications due to its low bandwidth usage and efficiency. Using MQTT for microservices enables fast, reliable, and asynchronous communication between services while keeping them loosely coupled and scalable.
What is MQTT?
MQTT (Message Queuing Telemetry Transport) is a lightweight, publish/subscribe messaging protocol designed for low-bandwidth, high-latency, or unreliable networks.
Key characteristics:
Broker-based communication model
Very low network overhead
Topic-based Pub/Sub messaging
Widely used in IoT and real-time systems
Why Use MQTT in Microservices?
MQTT offers several advantages when used as a microservice communication layer:
Lightweight protocol – minimal payload size
Real-time messaging – near-instant message delivery
Loose coupling – publishers and subscribers are independent
Scalable Pub/Sub model – one-to-many communication
Excellent for events & commands – notifications, signals, triggers
MQTT is not designed for heavy data streaming or durable message storage. For those use cases, Kafka is a better choice.
Why Use MQTT in Microservices?
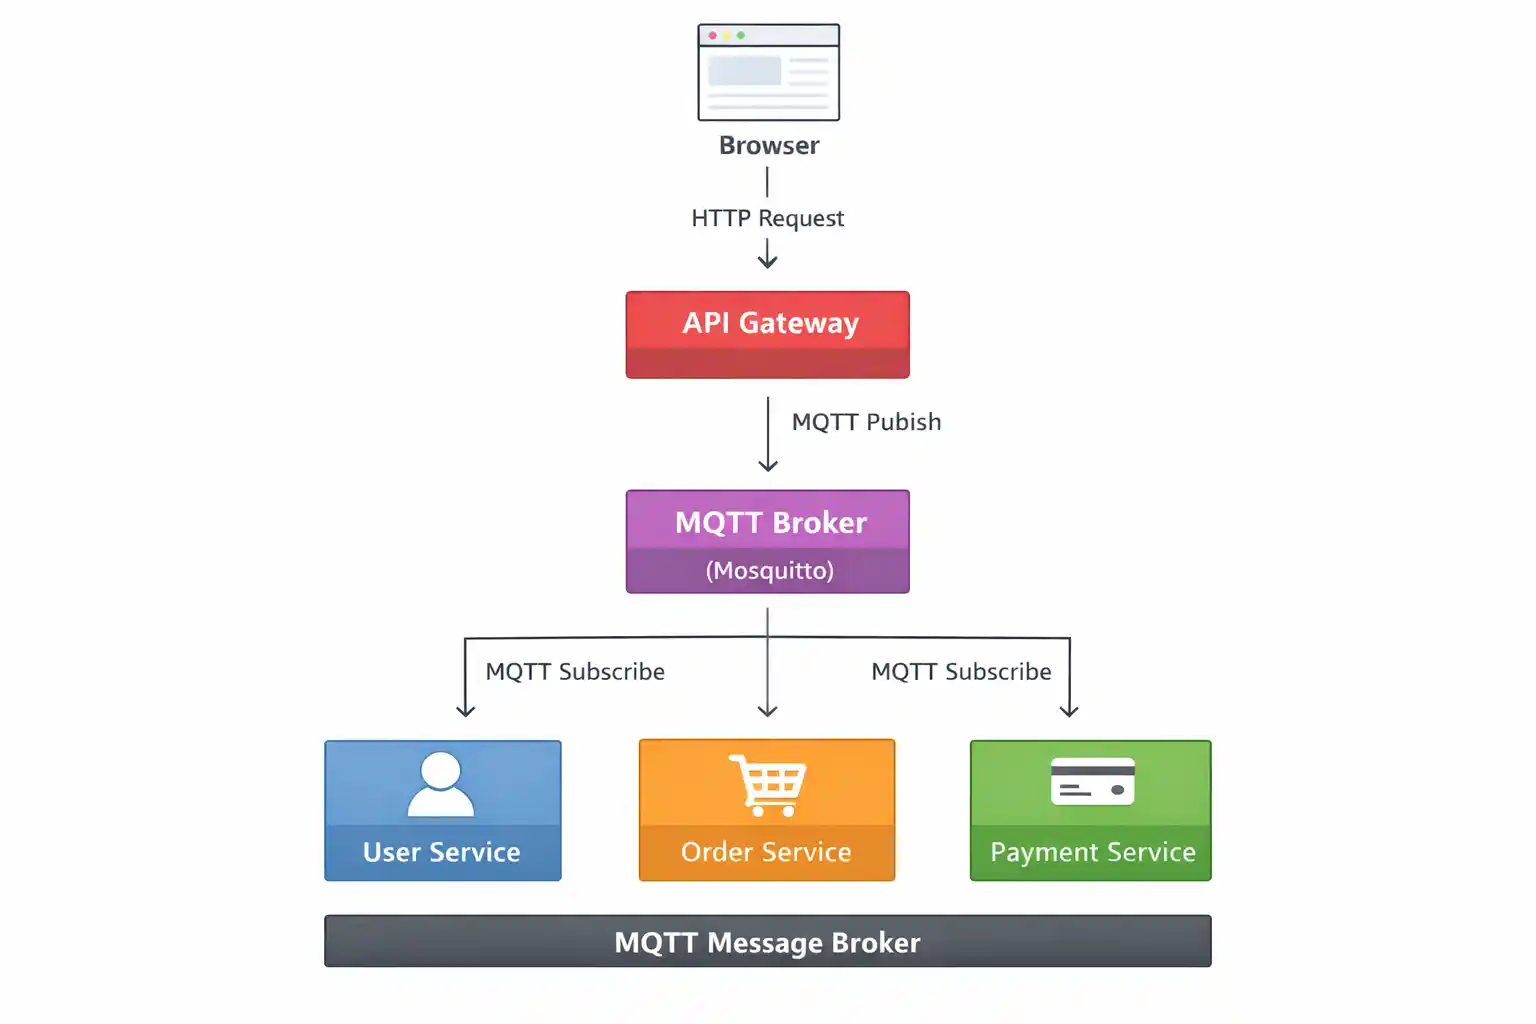
In this tutorial, we will create four NestJS microservices that communicate via MQTT:
User Service – Manages user-related operations
Order Service – Handles order creation and management
Payment Service – Processes payments and transactions
API Gateway – Serves as the single HTTP entry point for client requests
MQTT will act as a lightweight message broker, making it ideal for real-time, event-driven communication and IoT-style messaging between services.
Step 1: Install NestJS CLI
npm i -g @nestjs/cli Choose npm or yarn and enable TypeScript.
Step 2: Create NestJS Applications
3 Microservices
API Gateway – Client
Create four separate projects:
#1 nest new user-service
#2 nest new order-service
#3 nest new payment-service
#4 nest new api-gateway
Each application runs independently, forming a true microservices architecture.
Step 3: Install MQTT Dependencies
Run this in ALL four projects:
npm install @nestjs/microservices mqtt
Step 4: Install & Run MQTT Broker (Mosquitto)
Download Mosquitto for Windows
Download from: https://mosquitto.org/download/
Choose: mosquitto-<version>-install-windows-x64.exe
Install it and note the path (default):
C:\Program Files\mosquitto
Start Mosquitto Broker
Open CMD as Administrator:
cd "C:\Program Files\mosquitto"
mosquitto.exe -v
Expected output: Opening ipv4 listen socket on port 1883.
MQTT Broker is now running at: mqtt://localhost:1883
Step 5: Configure User Service (MQTT Subscriber)
Open user-service/src/main.ts
import { NestFactory } from '@nestjs/core';
import { AppModule } from './app.module';
import { Transport, MicroserviceOptions } from '@nestjs/microservices';

async function bootstrap() {
  const app = await NestFactory.createMicroservice<MicroserviceOptions>(
    AppModule,
    {
      transport: Transport.MQTT,
      options: {
        url: 'mqtt://localhost:1883',
      },
    },
  );
  await app.listen();
  console.log('User Service running with MQTT');
}
bootstrap();
Open user-service/src/app.controller.ts
import { Controller } from '@nestjs/common';
import { MessagePattern } from '@nestjs/microservices';

@Controller()
export class AppController {

  @MessagePattern('get_users')
  handleGetUsers() {
    console.log('MQTT get_users received');
    return [
      { id: 1, name: 'Amit' },
      { id: 2, name: 'Rahul' },
    ];
  }
}
MQTT topics replace REST routes in microservice communication.
Step 6: Configure Order Service
Open order-service/src/main.ts
import { NestFactory } from '@nestjs/core';
import { AppModule } from './app.module';
import { MicroserviceOptions, Transport } from '@nestjs/microservices';

async function bootstrap() {
  const app = await NestFactory.createMicroservice<MicroserviceOptions>(
    AppModule,
    {
      transport: Transport.MQTT,
      options: {
        url: 'mqtt://localhost:1883',
      },
    },
  );

  await app.listen();
  console.log('Order Service is running (MQTT)');
}
bootstrap();
Open order-service/src/app.controller.ts
import { Controller } from '@nestjs/common';
import { MessagePattern } from '@nestjs/microservices';

@Controller()
export class AppController {

  @MessagePattern('get_orders')
  getOrders() {
    console.log('MQTT message received: get_orders');

    return [
      {
        id: 1,
        product: 'Laptop',
        price: 60000,
        status: 'PLACED',
      },
      {
        id: 2,
        product: 'Mobile',
        price: 25000,
        status: 'SHIPPED',
      },
    ];
  }
}
Step 7: Configure Payment Service
Open payment-service/src/main.ts
import { NestFactory } from '@nestjs/core';
import { AppModule } from './app.module';
import { MicroserviceOptions, Transport } from '@nestjs/microservices';

async function bootstrap() {
  const app = await NestFactory.createMicroservice<MicroserviceOptions>(
    AppModule,
    {
      transport: Transport.MQTT,
      options: {
        url: 'mqtt://localhost:1883',
      },
    },
  );

  await app.listen();
  console.log('Payment Service is running (MQTT)');
}
bootstrap();
Open payment-service/src/app.controller.ts
import { Controller } from '@nestjs/common';
import { MessagePattern } from '@nestjs/microservices';

@Controller()
export class AppController {

  @MessagePattern('get_payments')
  getPayments() {
    console.log('MQTT message received: get_payments');

    return [
      {
        id: 1,
        orderId: 1,
        amount: 60000,
        status: 'SUCCESS',
      },
      {
        id: 2,
        orderId: 2,
        amount: 25000,
        status: 'PENDING',
      },
    ];
  }
}
Step 8: Configure API Gateway (MQTT Publisher)
Open api-gateway/src/app.module.ts
import { Module } from '@nestjs/common';
import { ClientsModule, Transport } from '@nestjs/microservices';
import { AppController } from './app.controller';

@Module({
  imports: [
    ClientsModule.register([
      {
        name: 'MQTT_SERVICE',
        transport: Transport.MQTT,
        options: {
          url: 'mqtt://localhost:1883',
        },
      },
    ]),
  ],
  controllers: [AppController],
})
export class AppModule {}
Open api-gateway/src/app.controller.ts
import { Controller, Get, Inject } from '@nestjs/common';
import { ClientProxy } from '@nestjs/microservices';
import { firstValueFrom } from 'rxjs';

@Controller()
export class AppController {
  constructor(
    @Inject('MQTT_SERVICE') private readonly client: ClientProxy,
  ) {}

  @Get('users')
  getUsers() {
    return firstValueFrom(this.client.send('get_users', {}));
  }

  @Get('orders')
  getOrders() {
    return firstValueFrom(this.client.send('get_orders', {}));
  }

  @Get('payments')
  getPayments() {
    return firstValueFrom(this.client.send('get_payments', {}));
  }
}
Step 9: Run the Applications
Start services in the following order:
# Start MQTT Broker
mosquitto
# Start Microservices in separate terminals
1# cd user-service && npm run start
2# cd order-service && npm run start
3# cd payment-service && npm run start
4# cd api-gateway && npm run start
Step 10: Test in Browser
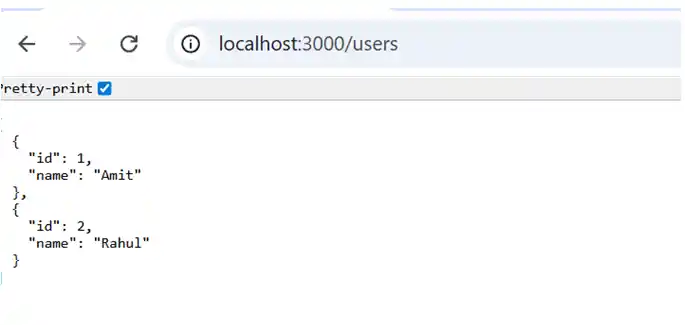
http://localhost:3000/users
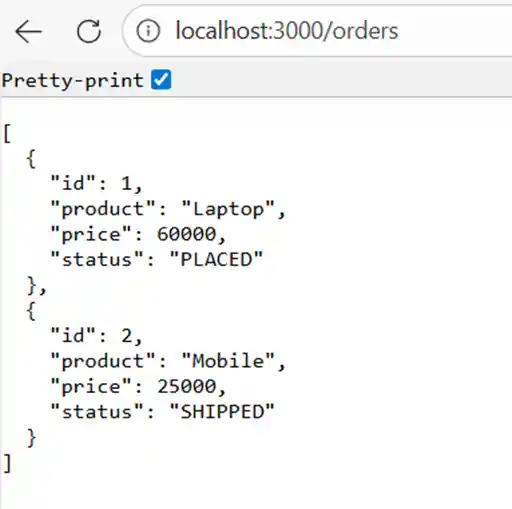
http://localhost:3000/orders
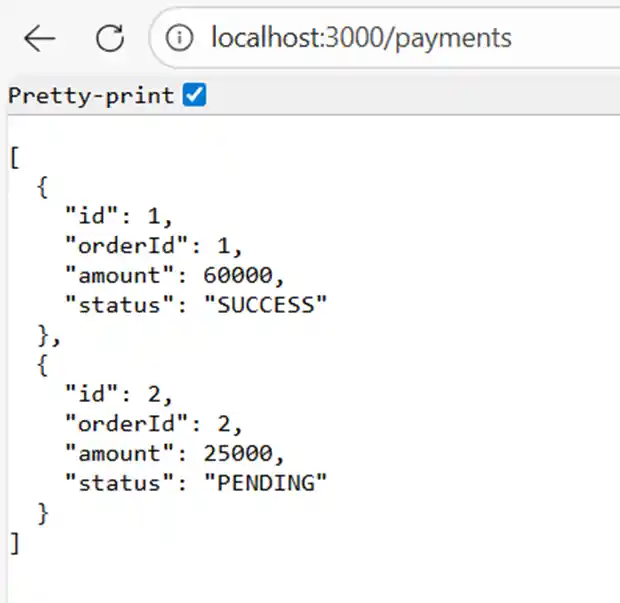
http://localhost:3000/payments
All responses are delivered via MQTT messaging and Now you will see data coming from the microservice, like.
#1 For User
#2 For Orders
#3 For Payments
Conclusion
In this project, we:
Built NestJS microservices using MQTT
Implemented Pub/Sub communication
Designed a single API Gateway
Compared MQTT with Redis and Kafka
Understood real-world deployment constraints
MQTT is ideal for real-time, event-driven microservices and IoT-based systems.